스택
자료 구조 목차
- Data-Structure
- Linear
- Static
- Array
- Dynamic
- Linked List
- Stack
- Queue
- Static
- Non Linear
- Tree
- Graph
- Linear
오늘은 긴말 안하고 바로 스택에 대해서 알아보자
스택
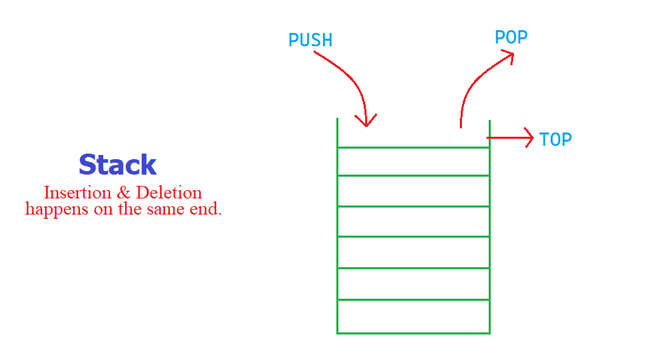
스택은 실행 시 특정 순서를 따르는 선형 자료 구조이다. 순서는 LIFO(Last In First Out) 또는 FILO(First In Last Out)일 수도 있다.
다음은 스택에서 사용되는 기본적인 수행 용어이다.
- Push : 스택에 요소 하나를 더한다. 만약 스택이 가득 찼다면 오버플로우(Overflow) 상태라고 뜰 것이다. *자바에서는 느낌이 조금 다를지도?…
- Pop : 스택에서 요소 하나를 제거한다. 요소들은 들어간 순서의 반대로 나온다. 만약 스택이 비어있다면 언더플로우(Underflow) 상태라고 뜰 것이다. *자바에서는
EmptyStackException으로 뜬다. - Peek or Top : 스택에 가장 마지막에 push한 요소를 리턴한다. *자바에서는
peek.top은 없다. - isEmpty : 스택이 비어있다면
true를 반환하고 아니라면false를 반환한다.
스택 그림
스택에 대해 이해하기
현실에서도 많은 것들을 스택의 예로 들 수 있다. 음식점이나 집에 쌓여있는 접시를 생각해보자. 접시를 꺼낼때(물론 어떻게든 가운데 접시를 꺼낼 수도 있지만 대다수가) 가장 위에 있는 접시부터 꺼낼 것이다. 이것도 LIFO/FILO 순서를 따른다고 볼 수 있다.
스택 구현 방법
스택은 배열(array) 또는 연결 리스트(Linked List)를 사용해서 구현할 수 있다.
배열을 이용한 스택 구현
public class StackArray {
    static final int MAX = 1000;
    int top;
    int a[] = new int[MAX];  // Maximum size of Stack

    boolean isEmpty() {  // top이 0보다 작다면 아무것도 없음으로 true 리턴
        return (top < 0);
    }

    StackArray() {  // 항상 top = -1로만 생성할 수 있는 생성자
        top = -1;
    }

    boolean push(int x) {
        if (top >= (MAX - 1)) {  // top이 MAX-1 값보다 크면 용량 초과
            System.out.println("Stack Overflow");
            return false;
        } else {
            a[++top] = x;  // top의 숫자 증가 및 배열[++top] 인덱스에 값 넣기
            System.out.println(x + " pushed into stack");
            return true;
        }
    }

    int pop() {
        if (top < 0) {  // 아무런 값도 없을 시 Underflow
            System.out.println("Stack Underflow");
            return 0;
        } else {
            int x = a[top--];  // 값 하나를 뺌으로 top--, peek는 --없이
            return x;
        }
    }

    // 위와 동일 a배열의 인덱스에 top--만 다름
    int peek() {
        if (top < 0) {
            System.out.println("Stack Underflow");
            return 0;
        } else {
            int x = a[top];
            return x;
        }
    }

    void print() {
        for (int i=top; i>-1; i--) {
            System.out.print(a[i] + "\t");
        }
    }
}

public class Main {
    public static void main(String[] args) {
        StackArray s = new StackArray();
        s.push(10);
        s.push(20);
        s.push(30);
        System.out.println(s.pop() + " Popped from stack");
        System.out.println("Top element is : " + s.peek());
        System.out.print("Elements present in stack : ");
        s.print();
    }
}
장점 : 쉽게 구현할 수 있다. 메모리 관련도 있지만 c언어쪽이기에 언급은 안하겠다.
단점 : 동적이지 않다. 런타임에 따라서 크기가 유동적이지 못하다.
연결 리스트를 이용한 스택 구현
public class StackLinkedList {

    StackNode root;  // 노드의 최초 시작점이자 삽입시 top부분

    static class StackNode {
        int data;
        StackNode next;  // 다음 노드 주소

        StackNode(int data) {  // data가 들어와야지만 생성
            this.data = data;
        }
    }

    public boolean isEmpty() {  // 노드 최초 시작점이 null이라면 true 반환
        if (root == null) return true;
        else return false;
    }

    public void push(int data) {
        StackNode newNode = new StackNode(data);  // 일단 노드 객체 생성

        if (root == null) root = newNode;  // 최초 노드가 없다면 최초에 대입
        else {
            StackNode tmp = root;  // 임시 tmp에 root를 넣고
            root = newNode;  // root에 새로 push한 노드 삽입
            newNode.next = tmp;  // 그후 push한 노드의 다음으로 tmp(이전 root) 대입
        }
        System.out.println(data + " pushed to stack");
    }

    public int pop() {
        int popped = Integer.MIN_VALUE;  // -21_4748_3648 : -21억 4748만까지 갈 일이 있나? c언어쪽에선 뭐가 다른가?
        if (root == null) System.out.println("Stack is Empty");  // 최초 노드가 없을 시 비어있다고 출력
        else {
            popped = root.data;
            root = root.next;
        }
        return popped;
    }

    public int peek() {
        if (root == null) {
            System.out.println("Stack is Empty");
            return Integer.MIN_VALUE;
        } else return root.data;
    }

    public static void main(String[] args) {
        StackLinkedList sll = new StackLinkedList();

        sll.push(10);
        sll.push(20);
        sll.push(30);
        System.out.println(sll.pop() + " popped from stack");
        System.out.println("Top element is " + sll.peek());
    }

}
장점 : 연결 리스트로 구현 시 런타임에 따라서 스택의 크기가 유동적으로 변할 수 있다.
단점 : 포인터 할당으로 인해 추가적인 메모리가 필요하다(java에서는 객체 주소를 말하는 것?).
자바에서의 스택 클래스(Stack Class in Java)
자바 콜렉션 프레임워크에서는 이전에 설명한 스택 모델과 동일한 개념의 스택 클래스를 제공합니다. 클래스는 LIFO를 기반으로 설계되어있습니다.
Push와 Pop 말고도 empty, search 그리고 peek라는 3개의 기능을 더 제공합니다.
스택 클래스는 Vector 클래스를 상속 받기에 Vector 클래스의 메서드도 사용이 가능하다.
스택 클래스의 상속 관계

스택에 상속된 인터페이스 :
- Serializable(직렬화) : 마커 인터페이스로써 직렬화 또는 역직렬화를 하기 위해서 구현해야한다.
- Cloneable(클론) : 클론하기 위해서 객체에 구현해야하는 인터페이스이다.
- Iterable
: 객체의 콜렉션을 반복할 수 있는지 없는지 확인한다. - Collection
: 다수의 데이터를 쉽고 효과적으로 처리할 수 있는 표준화된 방법을 제공하는 클래스의 집합(콜렉션의 요소)를 의미한다. - List
: 리스트 인터페이스는 콜렉션의 자식 인터페이스로써 순차적으로 저장할 수 있는 기능을 제공한다. - RandomAccess : RandomAccess는 리스트 상속에서 사용함으로써 리스트가 빠른 랜덤엑세스를 지원하는지 식별한다.
스택 생성 및 메서드 사용
import java.io.*;
import java.util.*;

public class Test {
    public static void main(String[] args) {
        Stack<Integer> integerStack = new Stack<Integer>();

        System.out.println(integerStack.push(1));  // return input if success
        System.out.println(integerStack.pop());  // return latest push and delete it
        System.out.println(integerStack.push(2));
        System.out.println(integerStack.peek());  // return latest push but don't delete
        System.out.println(integerStack.search(2));  // return latest index which match parameter
        System.out.println(integerStack.search(6));  // return -1 if nothing matches
    }
}
스택 클래스의 다양한 메서드 사용
- 요소 추가하기 : push() 메서드를 사용해서 스택의 top에 요소를 집어넣는다.
import java.io.*;
import java.util.*;

public class StackSample1 {
    public static void main(String[] args) {
        // Default initialization of Stack
        Stack stack1 = new Stack();

        // Initialization of Stack with using Generics
        Stack<String> stack2 = new Stack<String>();  // new Stack<>(); 도 가능

        // pushing the elements
        stack1.push(4);
        stack1.push("All");
        stack1.push("DevKS");

        stack2.push("Welcome");
        stack2.push("to");
        stack2.push("DevKS\'s Blog");

        // Printing the Stack Elements
        System.out.println(stack1);
        System.out.println(stack2);
    }
}
- 요소에 접근하기 : 스택의 첫 번째 요소를 검색 또는 갖고오기 위해서는 peek() 메서드를 사용한다. 요소를 검색 후 반환하며 해당 요소가 스택에서 삭제되지는 않는다.
import java.util.*;
import java.io.*;

public class StackSample2 {
    public static void main(String[] args) {
        // Creating an empty Stack
        Stack<String> stringStack = new Stack<String>();

        // Use push() to add elements into the Stack
        stringStack.push("Welcome");
        stringStack.push("To");
        stringStack.push("DevKS\'s");
        stringStack.push("Blog");

        // Displaying the Stack
        System.out.println("Initial Stack : " + stringStack);

        // Fetching the element at the head of the Stack
        System.out.println("The element at the top to th stack is : " + stringStack.peek());

        // Displaying the Stack after the Operation
        System.out.println("Final Stack : " + stringStack);
    }
}
- 요소 제거하기 : 요소를 제거하기 위해서는 pop() 메서드를 사용한다. 스택 최상위에 있는 요소가 뽑혀져 나오면서 스택에서는 삭제된다.
import java.util.*;
import java.io.*;

public class StackSample3 {
    public static void main(String[] args) {
        // Creating an empty Stack
        Stack<Integer> integerStack = new Stack<Integer>();

        // Use push() to add elements into the Stack. also can use add() which is in Vector class method
        integerStack.push(10);
        integerStack.push(15);
        integerStack.push(30);
        integerStack.push(20);
        integerStack.push(5);

        // Displaying the Stack
        System.out.println("Initial Stack : " + integerStack);

        // Removing elements using pop() method
        System.out.println("Popped element : " + integerStack.pop());
        System.out.println("Popped element : " + integerStack.pop());

        // Displaying the Stack after pop operation
        System.out.println("Stack after pop operation : " + integerStack);
    }
}
스택 클래스는 벡터 클래스를 상속받기에 벡터 클래스의 메서드도 사용가능하다. 너무 많아서 따로 언급은 하지 않겠다.
주의: 자바에서의 스택 클래스는 벡터 클래스를 상속받으며 레거시 클래스인 것을 주의해야한다. thread-safe class임으로 thread safety가 필요없다면 overhead(과성능)이다. 그러므로 싱글 쓰레드 환경에서 사용할 것이라면 ArrayDeque를 사용하는 것을 추천한다.
import java.util.*;

class StackSample4 {
    public static void main(String[] args) {
        Deque<Character> characterDeque = new ArrayDeque<Character>();
        characterDeque.push('A');
        characterDeque.push('b');
        System.out.println(characterDeque.peek());
        System.out.println(characterDeque.pop());
    }
}
이상으로 스택에 대해서 알아보았다.
스택이란 것이 아직 어디에 쓰일지 까지는 잘 모르겠다. 궁긍하다면 아래 Reference에 있는 각종 알고리즘을 참고하자